Instructor: Pat Pauly
The supply list has been provided by the instructor. If you have any questions, please contact the instructor at patpaulyart@gmail.com.
Supply List
Skill level: All, with basic experience working with dyes.
Material fee: $70 payable to Pat while at class
Equipment: (put your name on everything if you can)
Old clothes to wear, apron, rubber gloves
2 Table sized pieces of plastic – to wrap up wet pieces at the end of class
30” x 60” (used) cotton or polyester low-density batting to pad print table (or flat blanket)
4 washcloths or towels sized as washcloths for cleanup
Small high density foam paint roller 4-6”, optional large foam paint roller about 8”
3 Wide scrapers 4”– 6” –like Bondo brand putty scrapers (paint department of home store)
8 long handled spoons (approx. 10”) like kitchen baking size – to stir dye. NO Stir sticks!
Partial Roll of blue masking tape, roll duct tape for taping silkscreens
Two sharpie markers
8 yogurt or plastic food containers (quart size) with lids (tall, not shallow containers)
Scissors for cloth and paper, optional rotary cutter for paper or plastic
Notebook, pencil/pen, 6 sheets of copy paper
Camera, phone camera, or something to remember processes!
Optional if driving: One small 2-3 gallon bucket, Dust mask N95
Things for printing: 1-2 yards of string, thin plastic premade stencils, cutouts from plastic (under 1/16”). Please just bring a handful – not a boxful!
Notebook of ideas for motif IMPORTANT TO HAVE SOME READY See my Pinterest board https://www.pinterest.com/patpauly/motif-for-surface-design/
Silk screens 4 (or more) 16” x 20” or similar size. (order from Dick Blick http://www.dickblick.com/products/blick-cord-stretched-frame-with-110-monofilament-polyester-mesh/) or purchase $35 from Pat Pauly at the class. Try your luck, or send Pat an email to reserve patpaulyart@gmail.com
Fabric: 15 yards minimum, cut 5 in ½ yard pieces, leave 10 whole (feel free to bring more like 20 yards) of pfd 100% cotton. I order from Test Fabrics #419 or #400M. Call for prices and availability.
To prepare fabric for printing for this class: To see videos on my blog piecesanresistance.blogspot.com , search in the group of words at bottom of blog for “video” to see all the printing videos, and suggestions on how I soda soak.
https://piecesandresistance.blogspot.com/2020/06/how-i-soda-soak-fabric.html
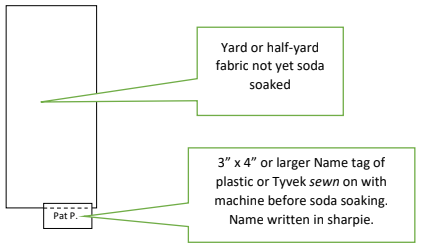
1. This is really important! BEFORE SODA SOAKING YOUR FABRIC (step 2) Sew tags with a sewing machine (not pinned or stapled) to your fabric with tyvek (old US mail envelopes, add in sharpie marker your first name and last initial .
These tags should hang off one corner, can be larger than 3” x 4”, but not smaller.
2. Soda Soak Make ahead of class, soda soak your fabric. In a large bucket add one gallon warm water to one cup sodium carbonate (soda ash), add fabric loosely (a few pieces at a time) to this solution and soak 15 minutes or more. Longer is ok, so chill! Also, please use gloves for anytime you handle soda soaked fabric, both wet and dry! The soda ash is corrosive to metals like aluminum, but doesn’t effect glass, plastic. It will dry your hands considerably, so wear gloves wet or dry.
3. Ring out by hand, hang on a line to dry, do not dry in dryer. Here’s a tip: after soaking, ring by hand slightly, then place in the bottom of a laundry tub or bathtub or shower, or similar (I’ve even used an empty bucket) to let “drain” for a while or overnight, and then when hanging up fabric there is a minimal drip of soda ash solution.
4. Smooth by hand and fold. They do relax and are fairly flat. Don’t worry about wrinkles! We’ll talk about how to deal with that, so ironing isn’t necessary.